Switching from Android to iPhone is like moving to a new home. You’re not just choosing a new device, but you’re committing to a new ecosystem. Understandably, one of the biggest hesitations many face is the daunting task of transferring data. How do you ensure all your precious photos, contacts, and documents make the journey intact?
Here, we’ve broken down the transfer process into simple, actionable steps. Whether you’re a tech newbie or a seasoned pro, our guide promises to make your transition between Android and iPhone as smooth as possible.
Without further ado, let’s take a look at the available methods.
| Name | When to Use | Data Types You Can Transfer | Cost | Rating (1-5) |
|---|---|---|---|---|
| Move to iOS | Before Setup | Contacts, Messages, Photos, Videos, Bookmarks, Emails, Calendars, and Free Apps | Free | 5 |
| Google Drive | After Setup | Contacts, Photos, Docs, Calendar, Audio, and Video | Free (with paid version) | 4 |
| Dropbox | After Setup | Files, Photos, Docs, Audio, and Video. | Free (with paid version) | 3 |
| MobileTrans | After Setup | Contacts, Messages, Photos, Videos, Songs, Calls, App Data, etc | Paid | 3 |
| AnyTrans | After Setup | Contacts, Texts, Photos, Videos, Songs, App, and App data, etc | Paid | 3 |
| After Setup | Files, Photos, Videos, Docs (depends on email size) | Free | 2 | |
| Instant Messenger | After Setup | Files, Photos, Videos, Docs (depends on app limits) | Free | 2 |
Methods 1. How to Transfer Data from Android to iPhone Using “Move to iOS”
In 2015, Apple made an Android app, “Move to iOS”. It helps people with a new iPhone or iPad move data like contacts, texts, photos, videos, bookmarks, emails, and calendars from Android. If you just got a new iPhone 13 or iPhone 14 and haven’t set it up, “Move to iOS” is the best free way to move your Android stuff over.
Preparation Before Transfer:
- Your Android should have version 4.0 or newer.
- The iPhone should be new and not set up.
- Both phones should be plugged into power.
- Both should be on the same Wi-Fi.
- Moving lots of stuff might take a while. Please wait.
- Free apps move over, but you need to buy paid apps again on the App Store.
Once you’re prepared, please follow this video or the following steps to transfer:
Step 1. Download the Move to iOS app from Google Play on your Android phone and then install it on your device.
Step 2. Set up your iPhone and choose > Set Up Manually > Move Data from Android > Continue. You will get a one-time code that you can use to connect your Android device.
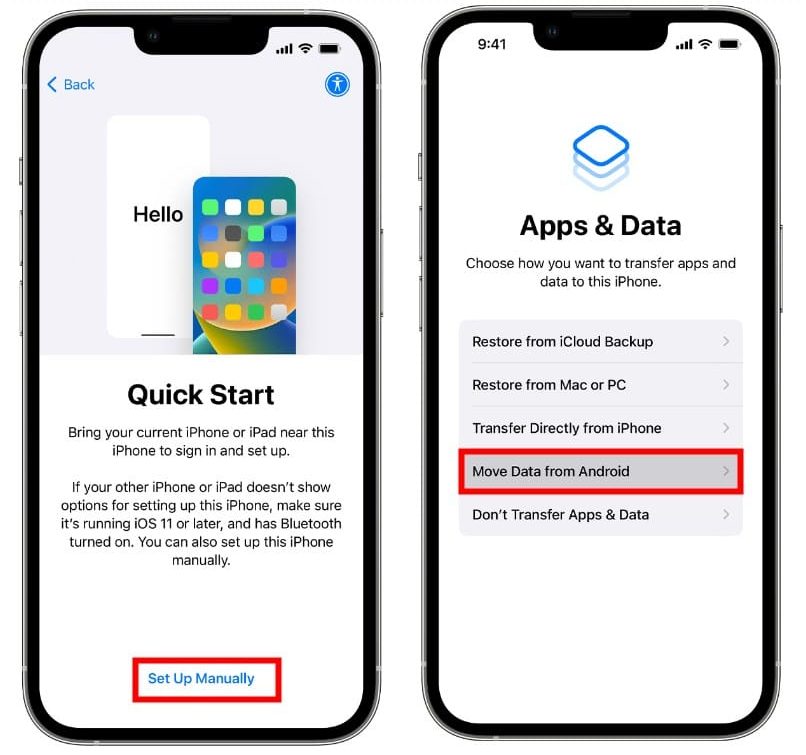
If your iPhone has been already set up, you have to erase your iPhone first by tapping Settings > General > Reset > Erase All Content and Settings, to tap “Move Data from Android”.
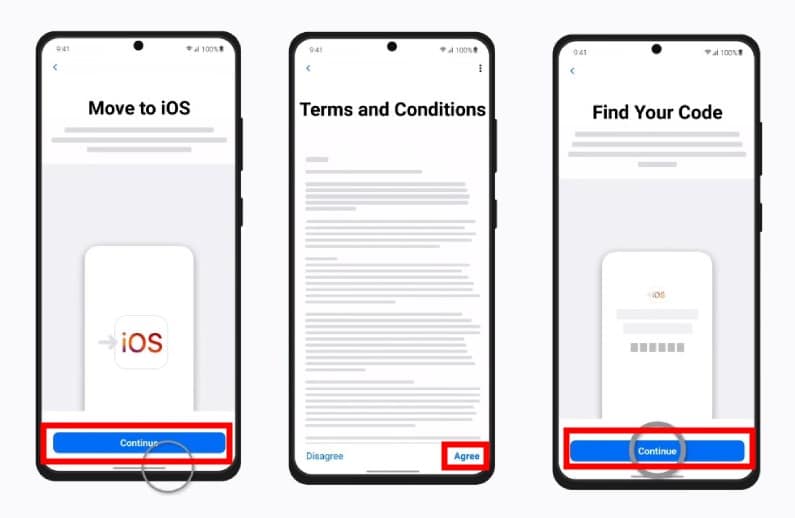
Step 3. Run Move to iOS on an Android phone and tap “Continue”. It will ask you if you agree to the appearing terms, tap “Agree” on your Android phone. After that, tap “Continue”.
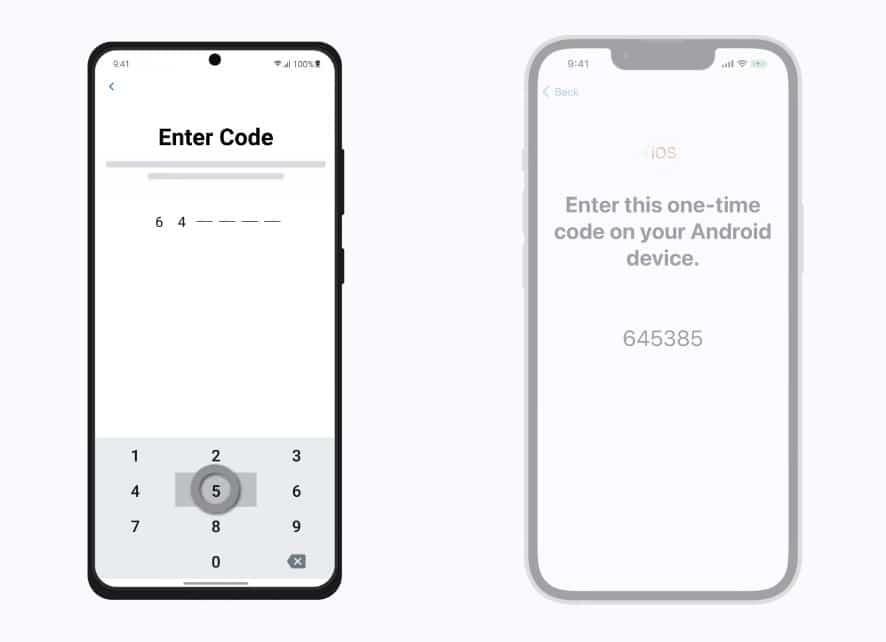
Step 4. Put the code on your Android, and then click Continue > Connect > Continue to build connections between your devices.
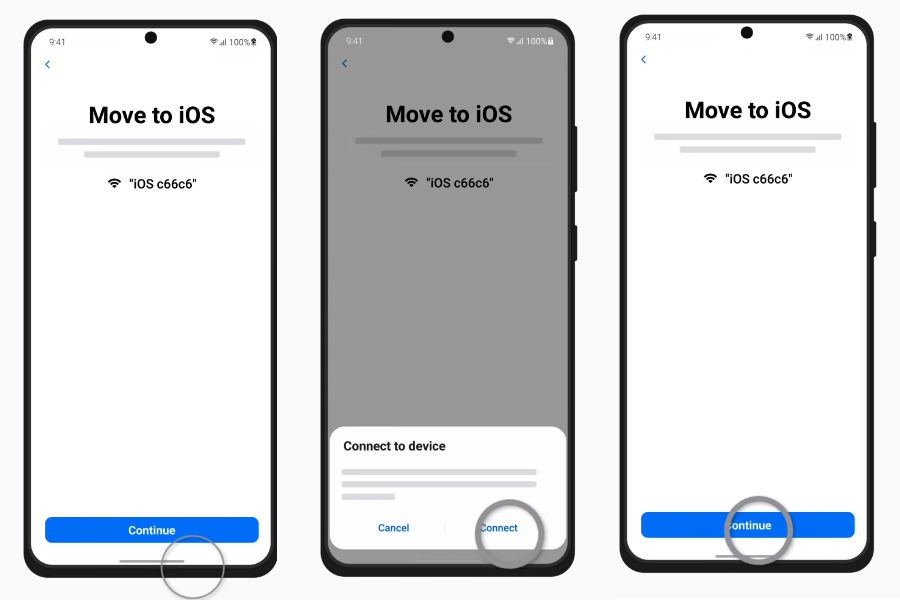
Step 5. On your Android phone, select the data, such as contacts, messages, photos, or bookmarks, that you are going to transfer to your new iPhone. After, tap “Next” to start migrating.
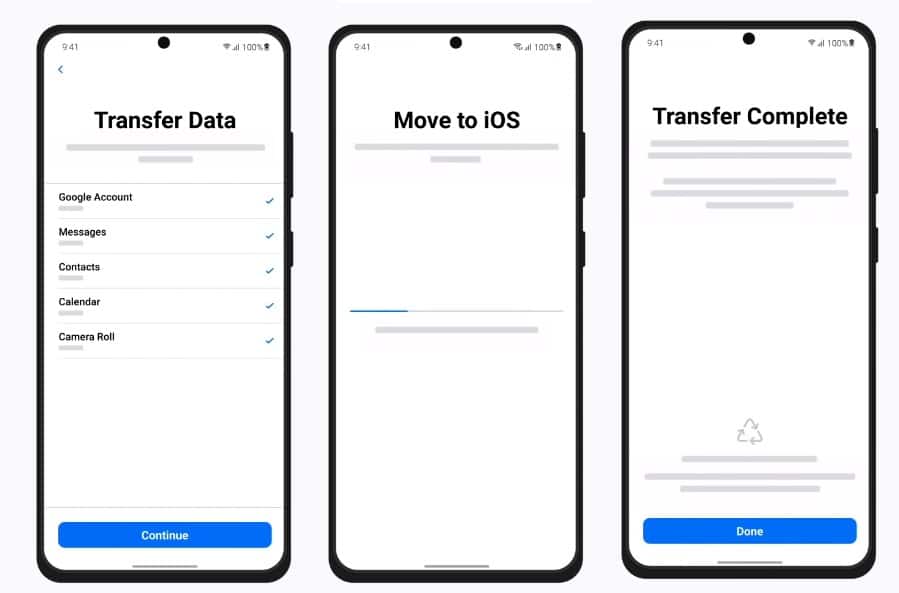
Step 6. Don’t use your Android phone or iPhone until the loading bar finishes the transfer process. And after, tap “Done”, and tap Continue on your iPhone to go on setting up your new device.
The whole process may take you minutes or hours, depending on how much data you transfer.
Method 2. Transfer Data from Android to iPhone Using Google Drive
Google Drive is mainly for storing and sharing files. But you can also use it to switch data from Android to iPhone. This is good for people who have many documents, photos, and videos. Just install Google Drive on both phones, then share and move your stuff.
Also, by syncing with a Google account and using the Chrome browser, you can get your calendar, contacts, and browsing bookmark on your new iPhone.
Here’s a Breakdown of What and How to Transfer:
| Data Type | How to Transfer |
|---|---|
| Photos, Videos, Documents | Upload to Google Drive on Android. Then, open Google Drive or the Files app on your iPhone to download. |
| Contacts & Calendar | Sync contacts and calendars to your Google account on Android. Then, access them by adding a Google account on your iPhone. |
| Browsing History & Bookmarks | If you use Google Chrome on Android and sync it, install Chrome on your iPhone. Then sync to see bookmarks and browsing history. |
Here’s a simple guide to transferring photos using Google Drive:
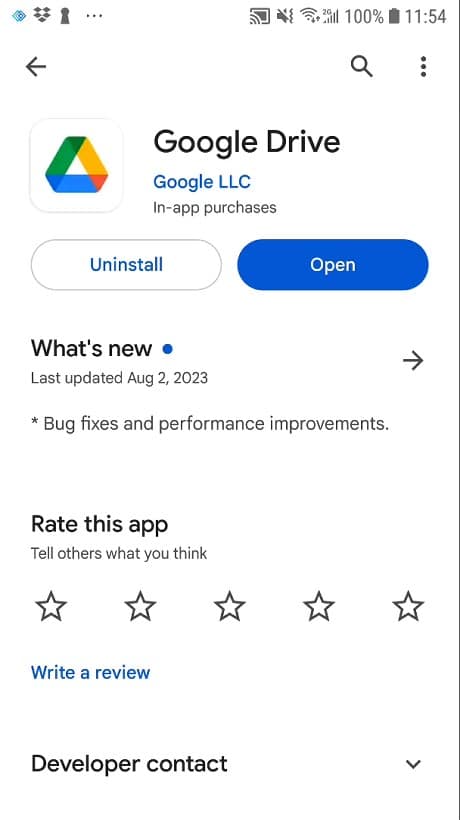
Step 1. Install Google Drive on both your Android and iPhone.
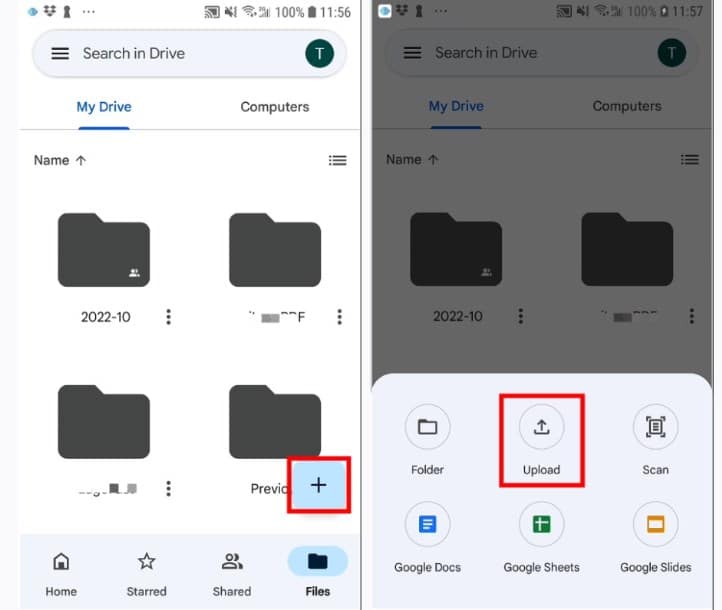
Step 2. On your Android, open Google Drive, click the ‘+’ icon, and choose ‘Upload’. Select the photos or videos and begin the upload.
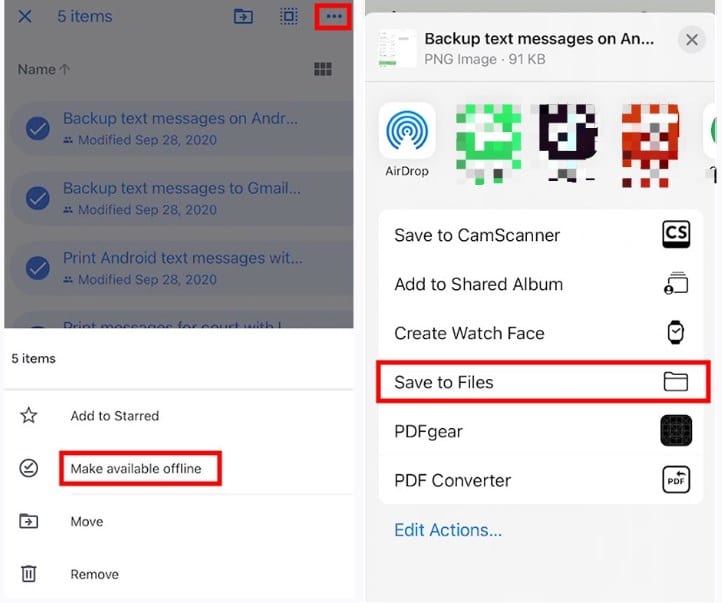
Step 3. On your iPhone, launch Google Drive and sign in with the same account. From there, you can either download the files for offline viewing or utilize the ‘Open in’ option to move them to other iOS apps.
The free Google Drive has a 15GB limit. And sometimes, it might make your photos and videos smaller.
Method 3: Using Dropbox to Move Data from Android to iPhone
Dropbox, much like Google Drive, is a popular cloud service for syncing and sharing files across devices. This feature makes it handy for transferring data from Android to iPhone. However, Dropbox’s free plan offers less space than Google Drive, with a 2GB limit. Upgrading for more storage might cost a bit more.
Yet, for file and document transfers from Android, Dropbox is user-friendly and fast. And it handles documents, photos, videos, and audio seamlessly.
Using Dropbox for Transfer:
Step 1. Sign up for Dropbox if you haven’t already. Download the app on both Android and iPhone and log into the same account on each device.
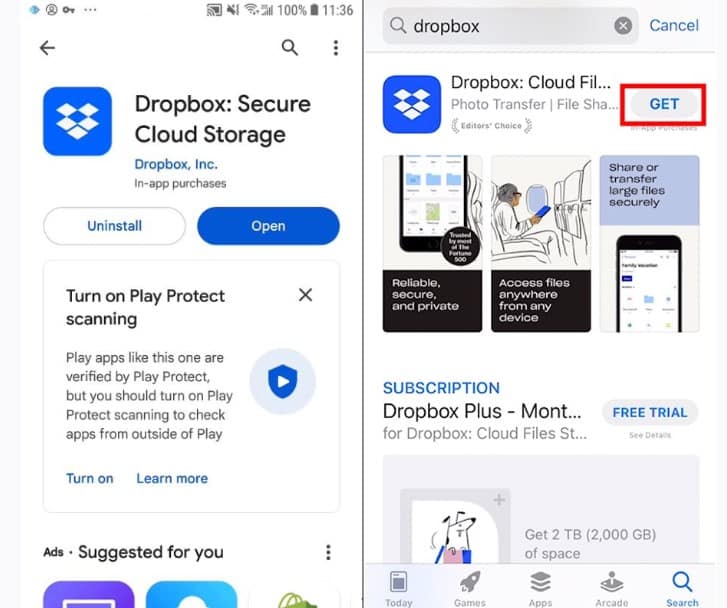
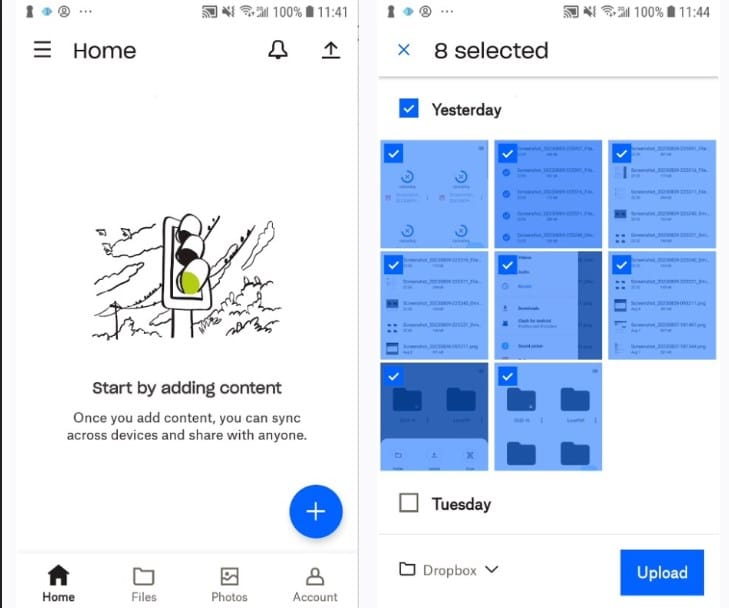
Step 2. Upload your desired files to the Dropbox app on your Android device.
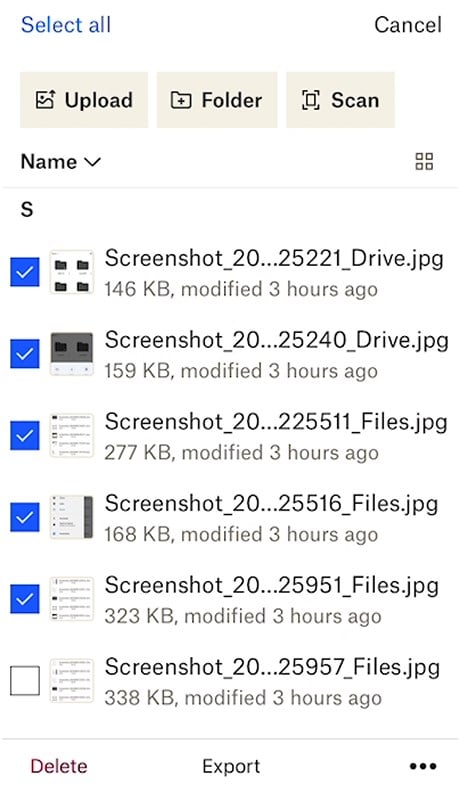
Step 3. On your iPhone, open Dropbox. Go to the Files section, select files, and then click Export to download your uploaded Android files.
Keep your transfers below 2GB if you’re on the free plan. If you have more to transfer, do it in parts.
Method 4: Transfer Data from Android to iPhone with MobileTrans
Compared to earlier methods, some paid software like MobileTrans offers a more straightforward and comprehensive solution. It boasts features like transferring extensive data (such as WhatsApp chats) and has a user-friendly interface tailored for non-techies.
To use MobileTrans, you’ll need a Windows or Mac computer. You will also need to connect both your Android and iPhone devices to this computer.
Here’s how you can transfer data from Android to iPhone using MobileTrans:
Step 1. Launch MobileTrans, then choose PhoneTrans > Phone to Phone.
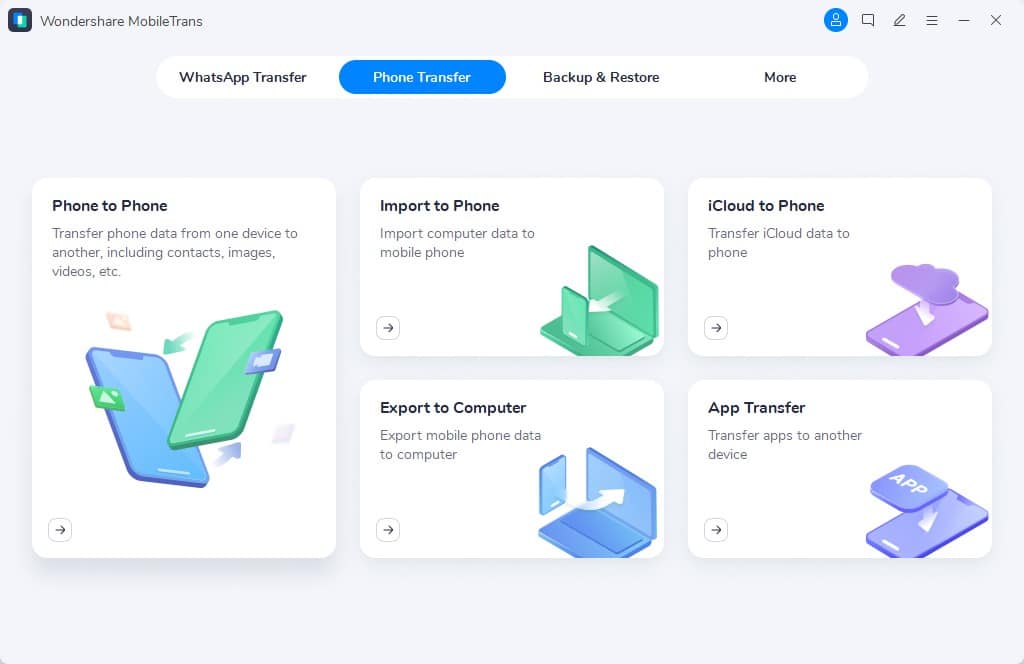
Step 2. Once MobileTrans identifies your Android and iPhone devices, select the Source and Destination device.
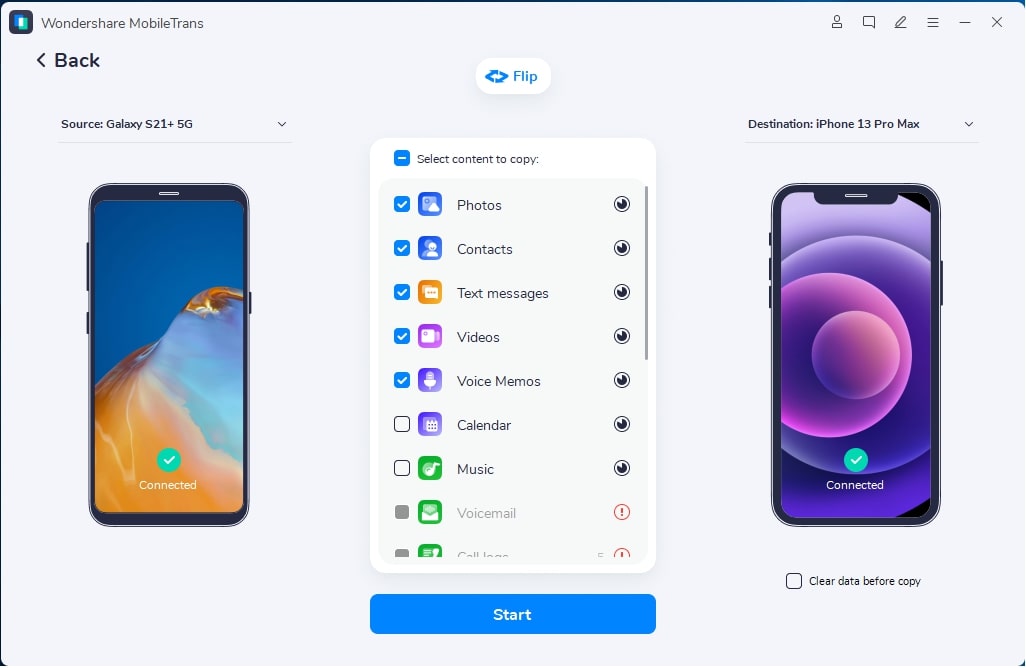
Step 3. Choose data types and click ‘Start’ to initiate the transferring process.
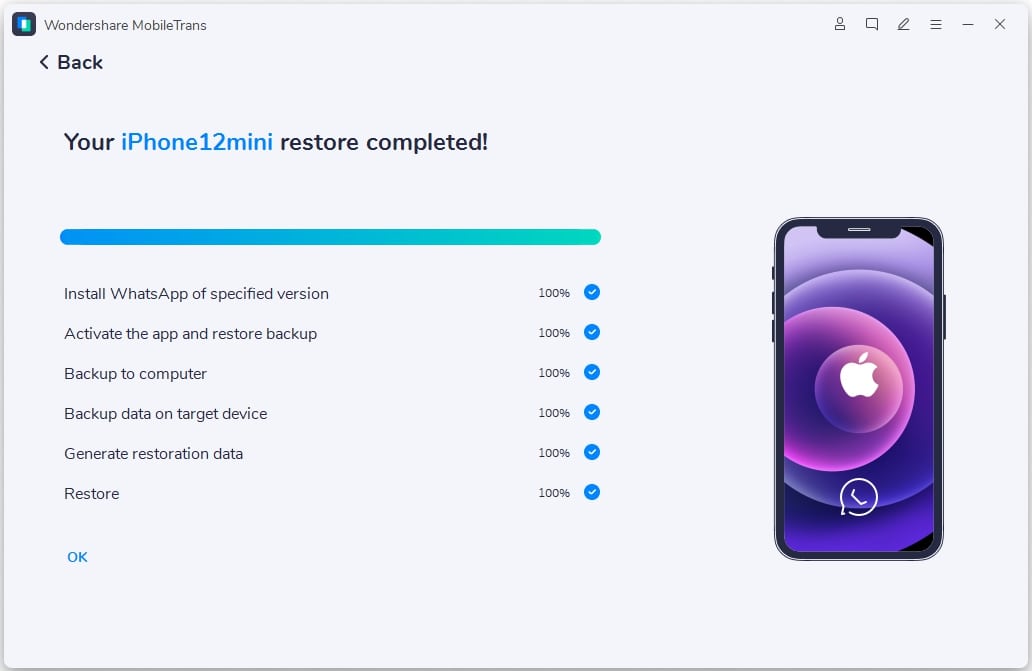
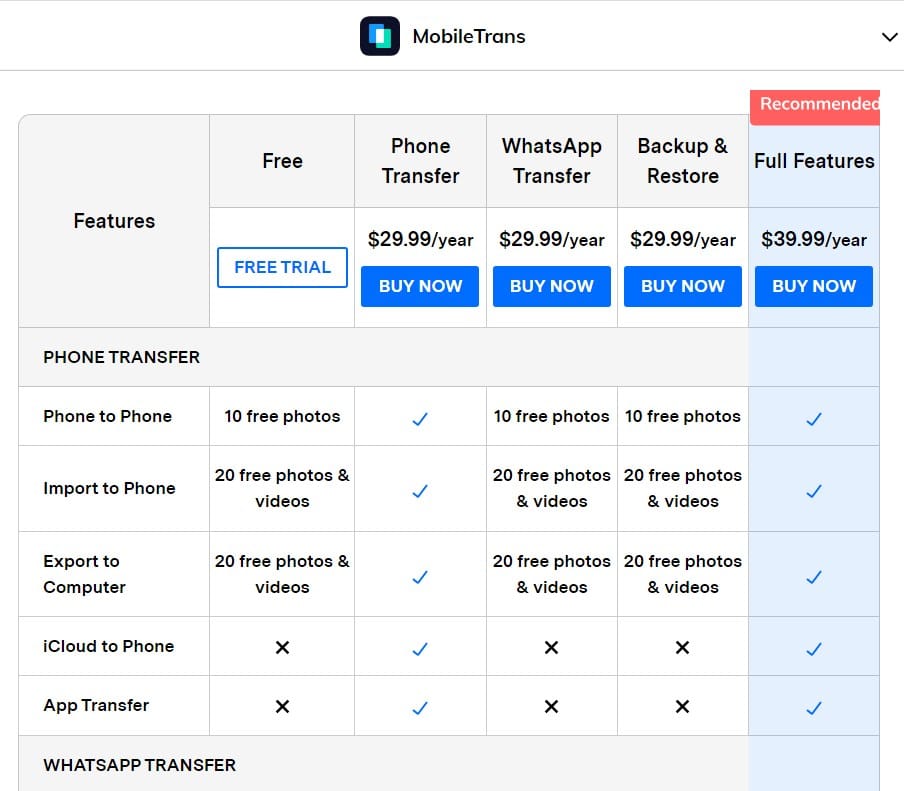
Although MobileTrans offers a mobile app supporting up to 8 data types, App Store reviews suggest the desktop version is superior. Therefore, it’s recommended to use their desktop software. The pricing is around $30/year, with a 7-day refund policy.
Method 5: Transfer Android Data to iPhone Using AnyTrans
Like MobileTrans, AnyTrans is a premium data transfer tool. However, AnyTrans emphasizes more on iPhone data management, while MobileTrans focuses on data transfer between two different mobile devices. From a long-term value perspective, AnyTrans might be more useful since it provides not just data transfer from Android to iOS but also features like making iPhone ringtones and mirroring iPhone screens to PC & Mac.
The transfer principles of AnyTrans and MobileTrans are similar: you should install the software on a computer and connect your devices before starting the transfer. Here’s how you can use AnyTrans:
Step 1. After downloading and installing AnyTrans, click on ‘Phone Switcher‘ in the left sidebar and choose ‘Phone to iPhone‘.
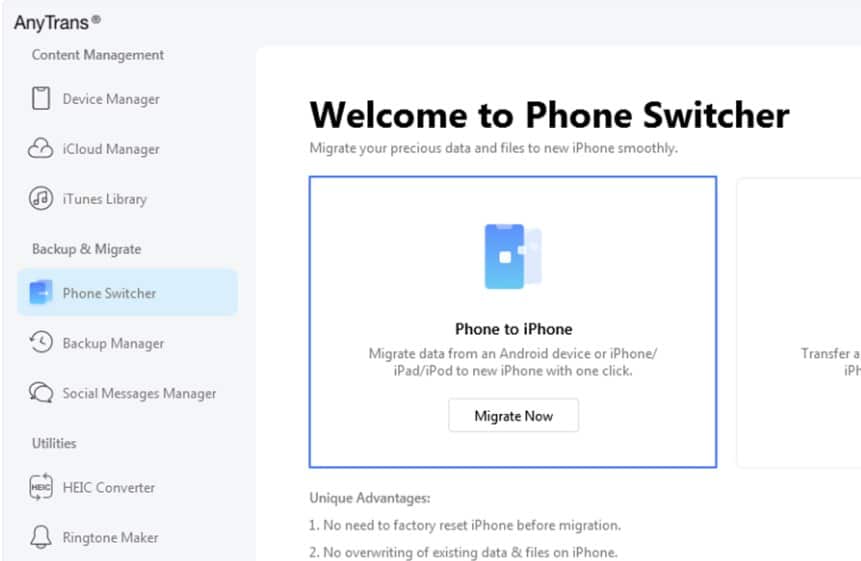
Step 2. Choose the type of data you wish to transfer.
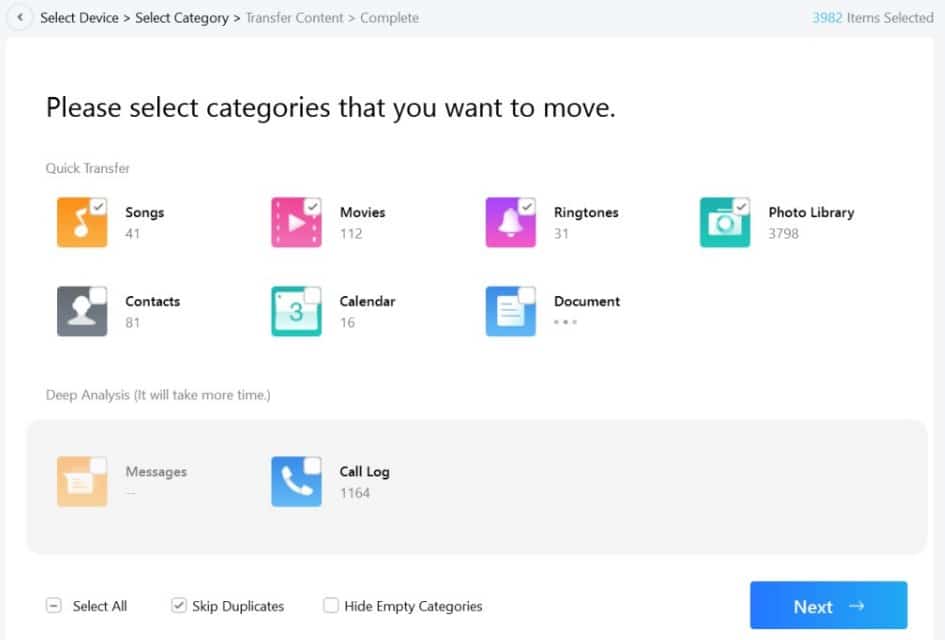
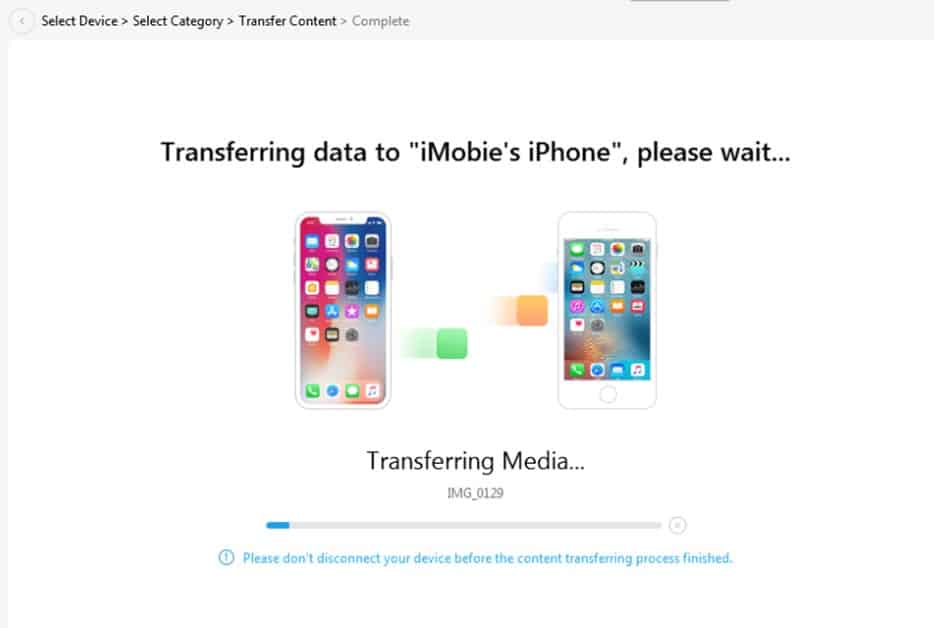
Step 3. Click ‘Next‘ to start the data transfer process.
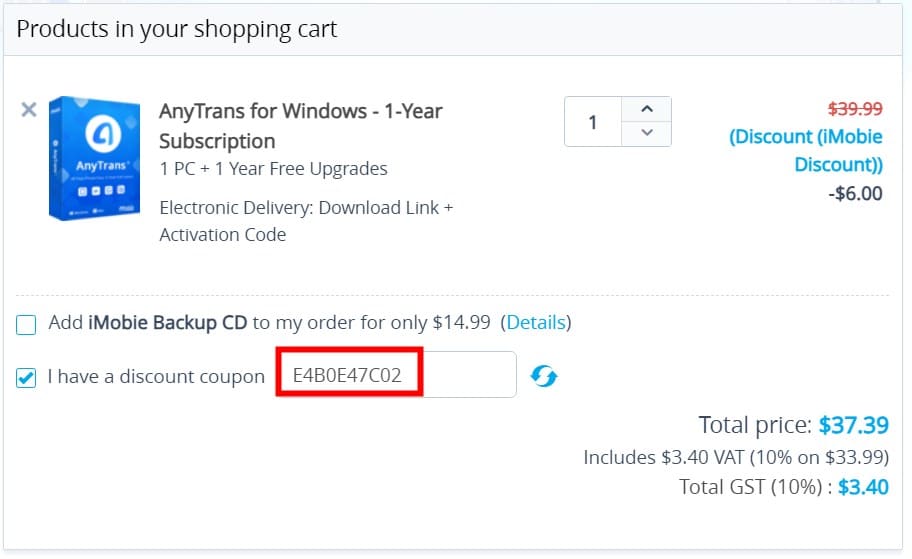
While MobileTrans has a per-feature pricing model, AnyTrans offers an all-inclusive subscription starting at $40/year (excluding taxes). By using this store link with the coupon code: E4B0E47C02, you can save about $6.
Method 6: Transfer Data from Android to iPhone using Email
Do you often send email attachments? If you only have a few files that aren’t very large, consider transferring them from Android to iPhone using this method.
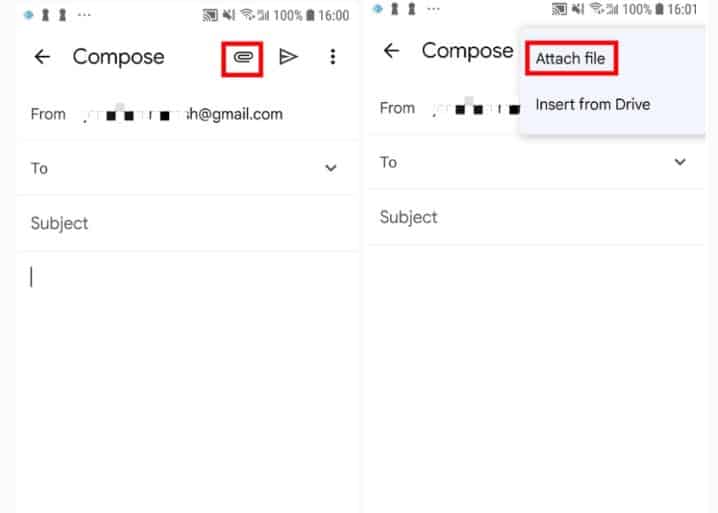
First, simply attach the desired files to an email on your Android device and send it to yourself. Then, open that email on your iPhone to download the attachments and complete the transfer.
This method can help you transfer files like:
- Documents: .doc, .pdf, .ppt, .xls, etc.
- Photos and Videos: Mind the email size constraints; lengthy videos might not be suitable.
- Contacts: Can be exported and imported in .vcf format.
- Music and Audio Files: Subject to size restrictions.
- Other Small Files: Depending on your email provider’s attachment size limit.
Most email providers cap attachment sizes, usually around 25MB, which limits the data type and size that can be transferred using this method. Thus, it’s more suitable for small-scale data transfers.
Method 7: Use Messaging Apps to Transfer Data from Android to iPhone
Messaging apps like WhatsApp, Discord, and Telegram are integral to many people’s daily lives. Besides chatting, these apps can transfer files and data. When migrating from Android to iPhone, these familiar messaging platforms can serve as a temporary data transfer method.
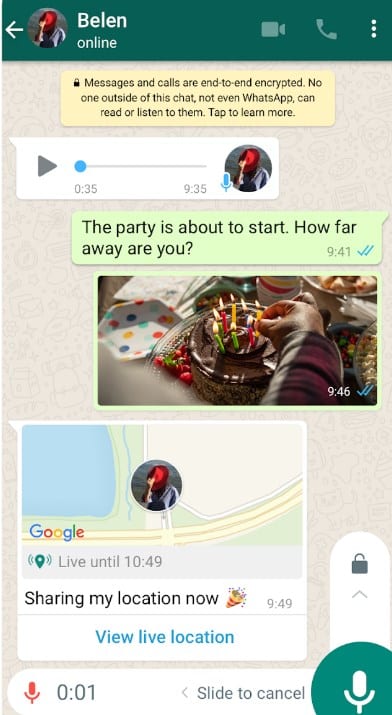
For instance, with WhatsApp, you can send files like images, videos, and audio. However, it’s more apt for transferring a limited number of files, not suitable for larger files due to size and type constraints.
Conclusion
Among the methods discussed, “Move to iOS” is a standout option, offering a free and efficient solution for many. If you’re in search of advanced features and have a more flexible budget, considering paid tools like MobileTrans and AnyTrans might be a wise choice; they are known for their versatility and user-friendliness.
Once your data transition is complete, it’s time to delve into the App Store and discover essential apps tailored to your needs. For added peace of mind, it’s suggested to set up iCloud for hassle-free backups and activate “Find My iPhone” to enhance your device’s security.